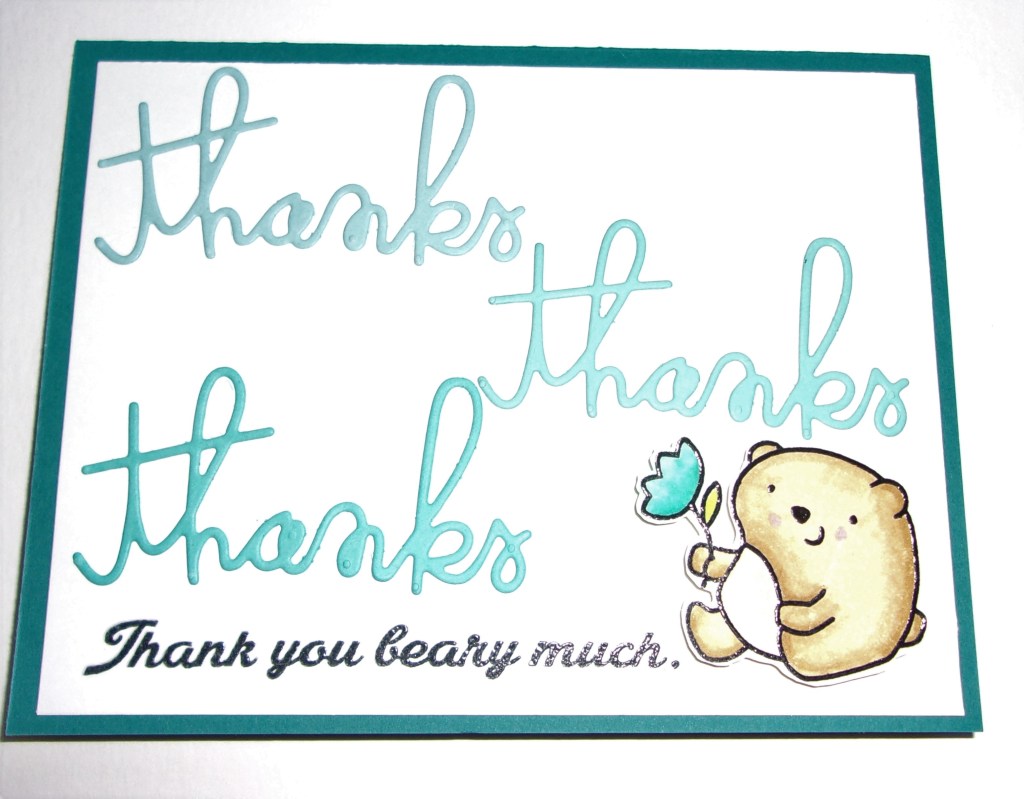
I used the sets Courteous Cuties and Courteous Cuties 2, along with the Thanks Word Die to complete the card. The paper is from Gina K Designs in the gradient of turquoise colors: Sea Glass, Ocean Mist, Turquoise Sea, and Tranquil Teal for the cardbase. The white is Hobby Lobby 110 pound heavy cardstock.
I love the set with the bear and the sentiment set that matches. The class lesson was to use a repeating die or stamp set in creating a rainbow of words. I thought the gradient colors worked for this idea.
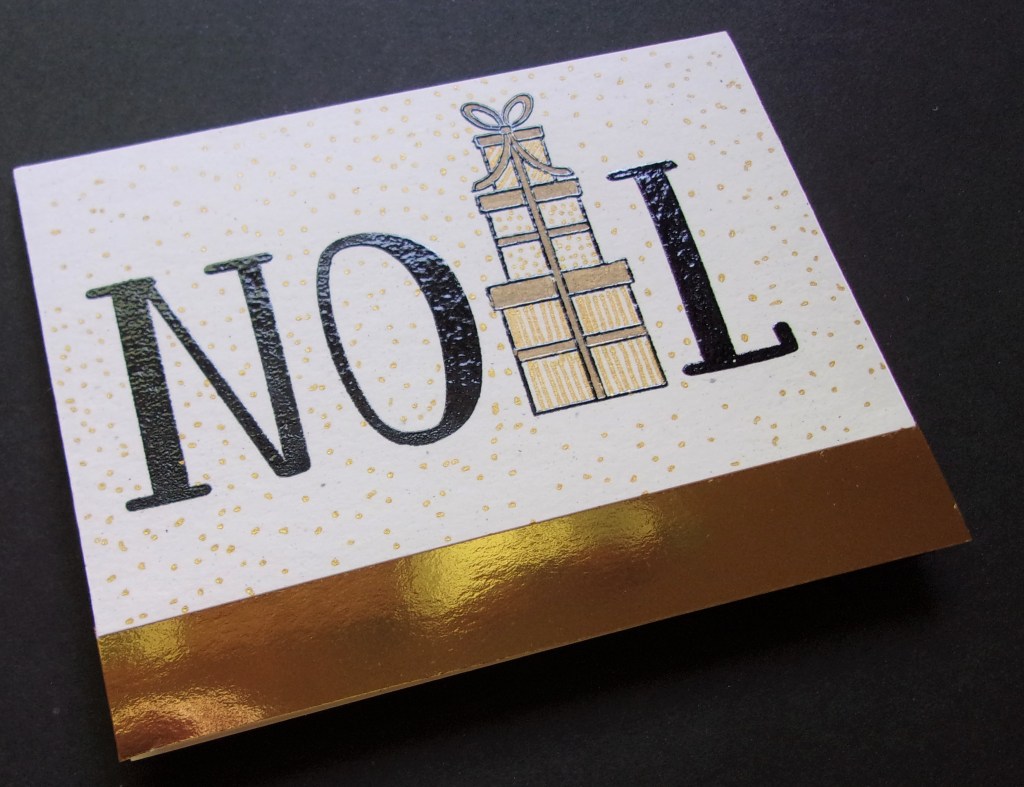
Day 10 is all about letter substitution. I have a stamp set by Maymay Made It called Noel. It is designed for letter substitution as it comes with Christmas images to substitute for the letter O or the E. I pulled out a stamp from The Stamps of Life penguins4Christmas, and used the gift for the letter E. To decorate the gift boxes I found a piece of patterned paper that had gold foil gifts all over it and I used it for inspiration. I used a gold Sharpie marker and a gold gel pen to decorate the boxes, like the patterned paper. I added dots all over the background with the gold gel pen, then added a strip of gold foil to the bottom of the card front.
I am slow posting the cards I have created as I go through the class. Today is Day 12, and this post will allow you to catch up with all I have created.
Day 3 Flourish Day 3 Roses
Day 3 was all about embossing with stencils. I watched the class video, tried getting my sandwich correct for my Big Shot and it wasn’t working. I finally went into the Gina K library and found a card she created a couple of years ago with the Cuttlebug. That was perfect for me, as I was able to get my sandwich correct. I embossed several pieces of cardstock, which are waiting to be used on a future date.
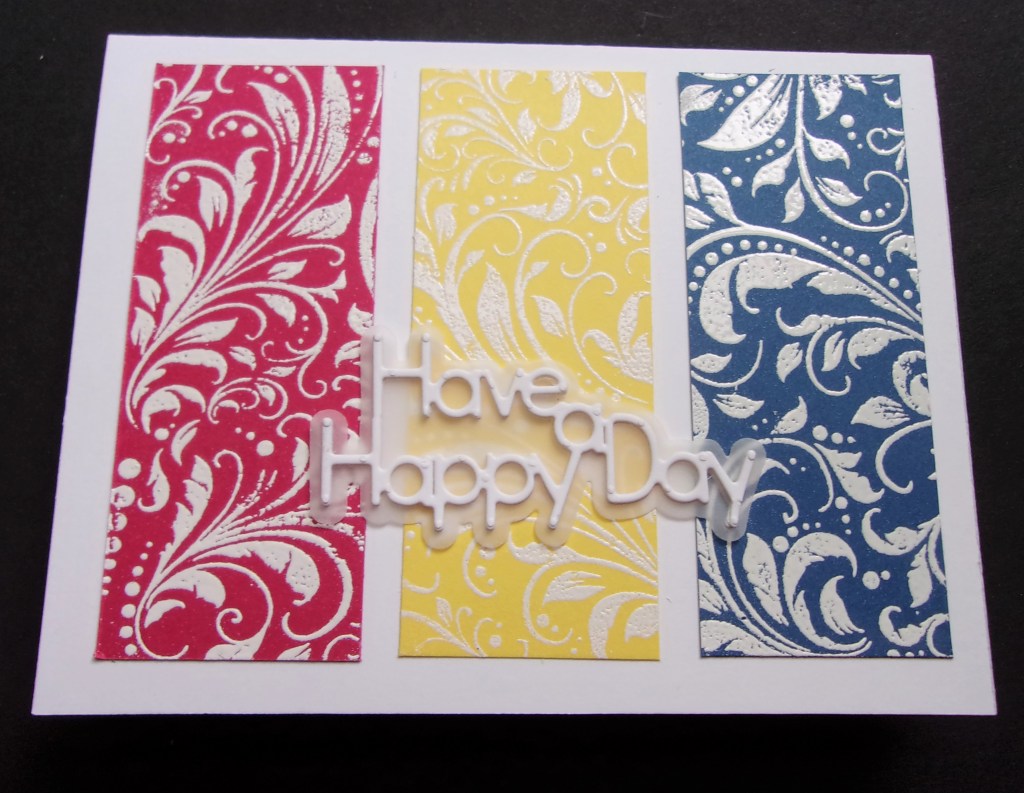
Day 6 Color Blocking
Day 6 was color blocking where the assignment was to either use embossing folders to create texture or use a stamp and heat emboss. I used the MFT Flourish background stamp on SU cardstock that is quickly retiring in color. These colors are Lovely Lipstick, Pineapple Punch, Blueberry Bushel and are heat embossed with Gina K Designs white embossing powder. The die is from Sizzix, part of a card die set. I enjoyed this class quite a bit and have pieces of this embossed paper left for other cards.
Day 7 Framed Vellum Day 7 Vellum Overlay
Day 7 was all about Vellum. For the first card I used the Flower Power die by Sizzix and Stephanie Bernard. I used a piece of scrapbook paper and tried laying the vellum on it, but it was too much lavender, so I finally decided it looked good on black. It needed the white behind the vellum and black to balance it, so I grabbed the Hello die, from Gina K Designs and cut the black Hello. By this time I had a large piece of black cardstock with adhesive on the back, so I keep cutting Hello dies from this cardstock, placing them on the card for a greeting.
The second card was fun to create. I placed the Friendship Blooms set in my MISTI and stamped it with black ink, followed by Versamark and used clear embossing powder. I simply do not like black embossing powder, so I usually use either regular black ink or a black pigment ink and clear embossing powder. The vellum overlay has a circle cut in the center for the flower to show through and a white frame added. I liked this card better then the one with lavender. The Hello die and the stamp set remained on my desk and MISTI for quite a while, so they both keep getting used.
Thanks for reading this post and sharing in my class creations.
I am posting several days of cards. I posted each on Split Coast and to the class from there. They were many new concepts for me and enjoyable to create.
Birthday Wishes fish
The fishy one is Day 1. I had trouble making an initial like Kristina Werner showed in the video, so I finally went with a circle. I used a few Gina K Design ink colors and ink blended. Then when the ink was dry, I added fish from The Stamps of Life Under the Sea set. The word birthday and the Wishes die came from the Elegant Asters Card Kit from Gina K Designs.
You are Amazing
This was Day 2, Make you own Stripes. I followed fell Buddy, Judy’s advice, in making sure to cover each inked stripe before moving on to the next one. I used a combination of painter’s tape and very low tack, purple tape. I managed to leave a few white stripes I liked it, so I made a few more white by not butting my tape exactly next to the one inked. The stamps are from Maymay Made It, called New Creation and Positive Vibes. I did add a few stripes of glitter pen. I enjoyed this once I began creating it .
Lifetime of Love
This is for Day 5, Stencil Shading. The idea is to give a vintage look to your stenciling. This is a new concept for me, but was quite easy once I began. I used Memento inks and a Hero Arts ink pad, along with my blender brushes. The instructor began with Warm Glow ink by GKD, but I do not own that ink so I used Desert Sand as that is my lightest brown ink. Then I added the pink from Hero Arts and the green from Memento. I used the sentiment from Wreath of Wishes, thinking this will be a good anniversary or wedding card.
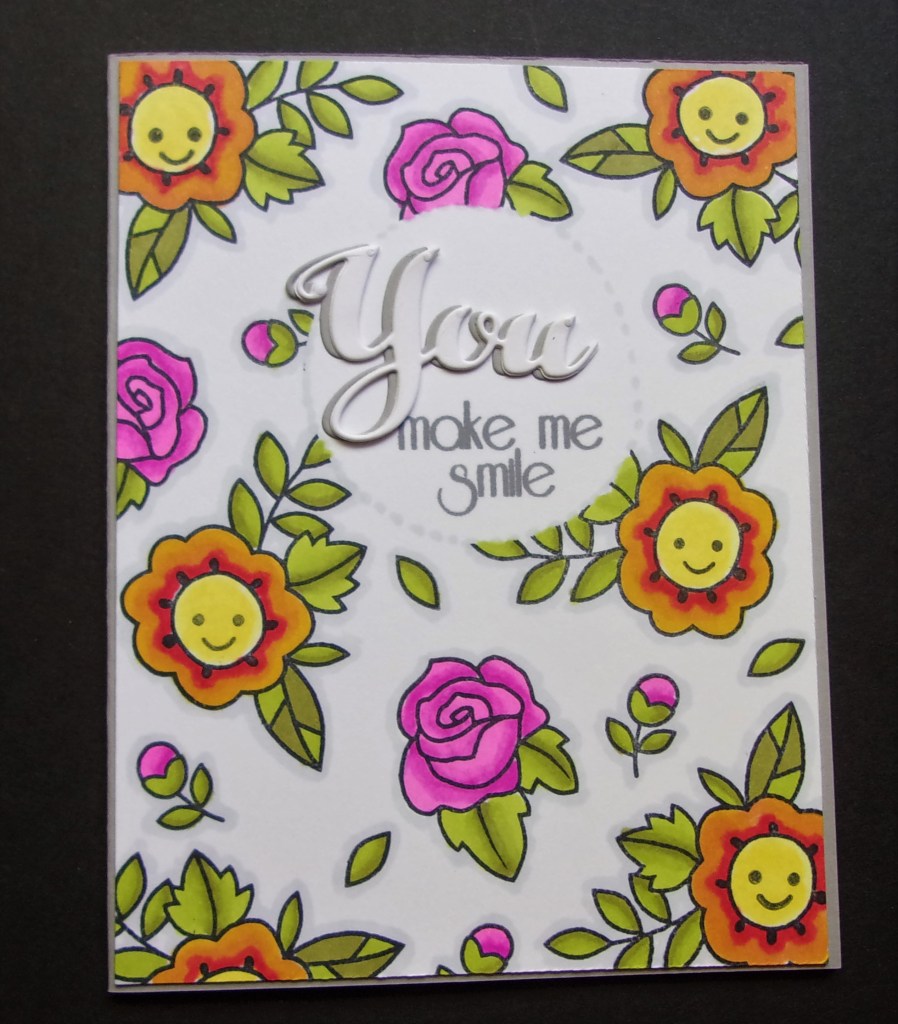
I used the Best Buds by Paper Smooches for the flowers and leaves. The sentiment is from All About You, a Stamp of Approval Cas-ual Friday set. I colored the images with Spectrum Noir markers.
Fun challenges. I am enjoying the lessons from the card camp.